Saturday, June 9, 2012

Making a Small Hooked Piece Stand

 Want to make that cute little hooked item stand?  Here are some
directions to make that happen . . .

 Zigzag 1/2 inch from the hooked item (leave a hem) and trim up to the zigzag.


 Pin the seam to the back leaving the hem open.


 Baste seam to back. Clip seam if necessary.


 Pin the item to wool fabric and cut around the item.


 Pin the fabric to the back.


 Whip stitch around picking up the thread of linen close to the hooking and 
then into the wool fabric.


Back (hem tucked inside). 


 Front (hem tucked inside).


 Stuff.


 Trace an oval on cardboard the size of the opening.


 Trim, trim, trim to fit . . . not too snug.


 Like this.


 Place your cardboard oval on wool fabric and cut an oval 1/2 to 3/4 inches larger.


 Gather the wool oval with a running stitch.  Pull to fit, then go around the gathers one more time.  Secure the thread.
If the hooked piece is tall, you may want to weight the bottom by putting pennies or plastic pellets in the bottom before you sew on the covered cardboard piece.  I make a little cloth bag to put the pellets in so they do not scatter everywhere.


 Whip stitch around close to hooking picking up the wool fabric 
and not the cardboard.


 Like this.


Enjoy.  Happy Hooking.

Friday, May 11, 2012

Marbleizing Wool

Yesterday I tried my hand at marbleizing wools together.  "Rug Hooking Daily" has a Dyeing Studio Group started by Caroline Dlugy-Hegwer.  She has a wonderful blog with beautiful wool creations.  Her blog is http://carolinedhstyle.blogspot.com/.

I tried her process of marbelizing wools together (no dye used, just twisting dark wools and light wools together and boil in water).  Find her process here.  It is a lot of fun and no mess.  Here are my results. If you are a hooker, you need to try this one!
The wools to the left are the before.  The darker wools are only very slightly affected, but see how beautiful the lighter ones turned out.

I also spent some time dyeing wool for our Guild.  We were in desperate need of golds and yellows.
Happy hooking everyone!


Friday, March 30, 2012

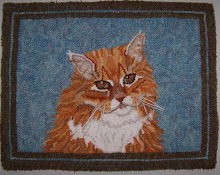
Fluffy finished . . .


Fluffy is now finished and hanging beside my computer so that I can look at her often.  She was a great cat!

Friday, March 2, 2012

Donna Hrkmann Workshop


The Crescent Lane Rug hookers invited Donna Hrkman for a workshop this past February.  (www.DonnaHrkmanDesigns.com)   She is a amazing teacher and we all loved her class.  Please visit her web page to see all the amazing things she has accomplished in her life, career, and her 8 years of hooking.  We have all agreed that we need her back for another workshop.  If you ever have a chance to take a class from her, GO for it!  You will be amazed as to what she can help you do.

I chose to do my cat "Fluffy" that passed away last year.  I think I captured her (or his, we never could determine) expression from the only decent photo I had.  Fluffy showed up at our doorstep about 5 years ago very matted and hungry.  I think Max brought her to us as they seemed to be great friends.  It took about 4 months to win her over and cut all her mats out of her hair.  That is when I discovered that she had been de-clawed and spayed/neutered.  She had golf ball size mats, I honestly do not know how she could sleep without them pressing against her.  She was a beautiful and sweet cat.  Her job was to help fold the clothes and to lay on my rugs when I put them down to look at them.  Max grieved for a week.  I miss her so much.


Tuesday, November 29, 2011

New things


 Here are some things that I have finished up recently.  "The Prairie Fox" is found in 'The Rug Hook Book" by Thom Boswell.  It was designed by Kathy Morton and her hooked original is 27" by 54".  I hooked a miniature version of her rug (12½" by 24") and it is one of my favorite rugs now.  I have it on a small table by my chair.


 The Shepherd and Sheep were designed by Nancy Thompson.  Again, hers were much larger (see other pictures) and attached to wooden boards, whereas my Shepherd is 14½ inches tall and the sheep are 4½ inches tall.  All are stuffed with poly fill and finished at the bottom.

The above is a pillow that I made for my rocker/glider chair I recovered last year.  It is a chair that my husband gave me when my first child was born back in the late 70's.  It sure doesn't glide as smoothly as the new gliders that are out now, but I still love it.  It needed a little something so I hooked the pillow for it.  I rock my grand children in it now.

Happy Hooking.

Tuesday, November 22, 2011

Auction Day

 The covered dish dinner and auction was fabulous.  Here are some pictures.
The sign in table for name tags, auction paddle numbers, and door prize jar.
Everyone went home with a door prize.  We had some GREAT things in them.

This is the table to buy raffle tickets for our wonderful raffle rug.
Some Autumn decorations to put everyone in a good buying mood.


Pretty pumpkins made from wool.  Some of these were in the door prize bags.
The Kitty would howl and hiss for about 30 seconds when you squeeze him.  Kathy could not resist.
The little acorns are felted wool in acorn shells.

These are items for the big auction.


This is the silent auction table.
Of course we ate first.  We know how to do a covered dish around here!


Let's eat!
Auction rules to follow.
Bidding frenzy at the Silent Auction Table.
Last minute sign up for the door prizes.
The Auctioneer and our own Vanna White modeling.

A happy bidder
This is most of our hooking group.  What a great day!

Saturday, November 12, 2011

Auction and Raffle


This Saturday will be the Crescent Lane Rug Hooking Guild's Covered dish dinner and Auction.
Here is a picture of the rug that we made to raffle off that day. Everyone who wanted to hook a square got one free raffle ticket. Everyone could hook anything they wanted, and just look how cute it turned out. It was agreed that we would keep a rug going all the time and when someone wants or needs something to hook, it will be available to them at our hook nook.

During our lunch, we will have a Silent auction of several items to bid on. The auction will follow immediately after lunch. Each item was handmade by someone or a bought handmade item. We will also have enough door prizes for everyone. It will be so much fun.

We have so very many wonderful items for our auction. I hope to get some good pictures to post. Happy Hooking!

Friday, November 4, 2011

Make a cute magnet for your scissors and hook . . .


You can make a cute magnet to hold your favorite hook and scissors for yourself or for a hooking friend. It is not difficult, and the magnets keep your hook and scissors handy. One magnet is placed on top and the other magnet is placed underneath your linen to hold the top magnet in place.

NOTE: I found the directions for making the sweet little snippet bag on Linda's blog at http://thewoolcupboard.blogspot.com/  in the October 9, 2011 post.

You will need the following: wool fabric, fabric for lining, two strong magnets, pins, a needle, scissors, embroidery floss, buttons and scrap wool (optional).
I bought my magnets from Home Depot. They are a 3/8 inch x 7/8 inch by 7 7/8 inch block, two per package for about $2.50.

Cut 4 pieces of wool and 4 pieces of lining 3 1/4 by 4 1/2 inches.


Sandwich your magnet in between 2 lining pieces and then two wool pieces. Pin, centering the magnet.


With your needle and embroidery floss (all 6 strands), use a running stitch to secure the magnet in all the layers. Hide your beginning and ending knots in between the layers. The lining pieces will help to protect the wool from the sharp edges of the magnet. NOTE: Check the polarity of the magnets before you sew the second one if you are mixing your wool around like I did on the example. I can change my magnets around to show a different side.


Trim your lining pieces shorter than your wool pieces.


Embellish your magnets with scraps of wool and buttons if desired. Treat yourself . . . or make one for a friend. Happy Hooking!

Monday, October 31, 2011

Allie's Rug


Now that the new grand baby is here, I wanted to make a rug for her big sister (my first grand child) who had to give up her room and move upstairs. That is a lot to ask of a big sister!

I decided to let Allie design her own rug. She looked through some of my rug hooking books and decided on some things to put in her rug. I gave her a large piece of paper (a mistake on my part) and she filled it up with her favorite things . . . Hearts and Stars and Flowers. I helped her with the leaves and side leaves and stems. Then she wanted a dog in the center. D-Daddy (my hubby) taught her how to draw a dog.

My next step was to talk her out of half of the tulips in the center. She decided on color placement and went through all my wools and picked out her favorite colors, all blues and purples. She liked dots, so she told me to add some.

When I gave her the rug, her face lit up with joy to see her drawing on a rug. I was trying to impress her and I pointed out that I added purple tint to the background wool. She studied it for a moment and said, "That's O.K., MooMoo. I don't think anyone will notice. Oh well, so much for for that.

It looks so adorable in her room.