Thursday, January 21, 2010

Hooking with Yarn continued . . . (Jet Award)


I have completed hooking my project with yarn. For the border, I used a chunky yarn 100% wool in a charcoal grey. The chunky wool yarn hooked much easier with very little splitting unlike the 4 ply acrylic. Then on a scrap backing, I tried using a 3 ply 100% wool with a single strand and then with a double strand. It too hooked up easier than the acrylic yarn. If you choose to hook with yarn, my suggestion is to go for wool instead of acrylic. The wool texture is better and does not have a tendency to pull out or split. The acrylic was really not bad to hook with, but it does have a tendency to split (which is aggravating) and has a softer finish (which could cause it to pull out of the backing). However, I did love the look of hooking with yarn. It was interesting and different . . . a definite change of pace.

Here are some pictures to show the comparison of the size difference of yarns I used.

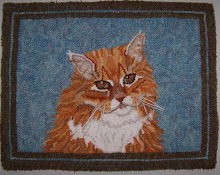
The darker spots on the hooking are from the ends of the yarn that were brought to the top and cut even (not as noticeable when looking right at it) . I'm making the hooked piece into a pillow to finish it.

Monday, January 18, 2010

Hooking with yarn for the Jet Award


Last night I started working on the Jet Award for the Merit Program. The projects for earning the Jet Award requires working with alternative materials. For my first project, I chose to hook with yarn. I have an abundance of left over yarn from knitting mittens for Christmas a few years back. The yarn is mostly 3 and 4 ply acrylic so the mittens would be easy to wash and I had a wide variety of colors.

To start my project, I drew a 12x12 inch square on some inexpensive burlap that I had and divided that into triangles. On my first two triangles, I used a single strand of yarn. The weave on the burlap wasn't quite tight enough and I had to go back occasionally and pull up a lost loop or two which made it time consuming. On the third and remaining triangles, I decided to double up on the yarn. It made the hooking so much easier and covered the area to be hooked much faster. I still had an occasional lost loop and sometimes the yarn would split which was a little aggravating, but I really liked the look. Here is a view of the back. It could be neater, but I was concentrating on the front more than the back.
There is a warning here to be VERY careful putting the hooked part on your frame. The gripping strips wanted to pull out the hooking when I tried to reposition my mat.

The project is going fairly quickly (this is what I have done since last night). I could see me making a small rug using yarn but with a tighter weave backing.
Here are a few pictures showing how I hook with it. I cut off a long length of yarn and folded it in half. I began hooking by pulling up the loop end, then I continued hooking pulling up two strands at a time. To finish, I pulled up the tails and cut them even with the hooking.


Wednesday, January 13, 2010

Finished Color Rug!


Just finished the binding last night on the Color Rug for the Merit Program. This rug has 6 of the projects required for the Peridot Award, each project is either 10x10 inches or 5x20 inches (total area each project 100 square inches for a sampler rug). I chose the following projects to hook in my rug: a color wheel, all primary colors, complimentary colors, tertiary colors, cool/warm colors, and an obvious balance color plan.
To begin, I measured off blocks on my linen and then drew a design for each category as I finished the previous one. All colors co-ordinated in some form or fashion because I dyed the wool with one color palette using April DeConick's "Palette Dyeing" method. It is amazing how the colors flow and blend together using this dyeing method. I was worried about how it would look to hook primary colors next to the other projects, but it doesn't seem to matter since all the colors are from the same family of dyes.
On the border are words that I learned about color, and when possible I hooked with the appropriate wool to demonstrate that word.

Value,
Tint,
Shade,
and Tone
are examples. The words for the 6 projects that I chose to complete the Peridot Award are next to the project. I also had room for my

secondary colors
and my neutrals.
Because I chose to do lettering in the border and binding my rug by whipping with yarn, I will get credit for two projects in the Ruby Award. And, by dyeing all the wool in this project using chemical dyes, I get credit for one project in the Amethyst Award.
I will now submit my rug and descriptions to the Merit program for review.

Saturday, January 9, 2010

Neutrals, Tones, and Shades (Palette Dyeing)


In the past week I have been dyeing more wool to finish up my Palette Dyeing. I am learning Neutrals (equal amounts of complimentary colors), Tones (color plus grey), and Shades (color plus black). It is so exciting to see the colors that are created using the color palette that I chose. This is a picture of my Neutrals; two values of red and green, two of blue and orange, and two of yellow and violet. Each is so unique.

Next are my Tones. I used a yellow-green in value #2 with 1/16, 1/8, 1/4, 1/2, and 1 tsp. of my grey dye mixture (grey dye used was Pro Chem Mouse Grey). The top swatch is the original color.

Here is what it looks like on my Color Rug.

Last are my swatches of Shade. I used value #2 of red-orange with 1/16, 1/8, 1/4, 1/2, and 1 tsp. of my black dye mixture (Pro Chem Black). The first swatch is my original color.

Here is what it looks like in my rug.

I really thought that dyeing Neutrals, Tones, and Shades would be boring but I was quite surprised at the results. I really like the Shades and can see where it would add a lot of depth to hooking a rug.

Sunday, January 3, 2010

Continuing on with the Color Rug . . .


I am continuing to hook on my 'rug of color' for the Peridot Award. The border is almost finished, I do want to make some changes, however. I worked my initials in the neutral colors from my "Palette Dying", but it looks out of place so I will re-hook them using a color with the blue-green border background. That will be more consistant. (If you want a laugh, look closely at my initials. I hooked them upside down and got the 'J' backwards. Think before you hook!) Also, I haven't dyed the wools for the "TONE" and the "SHADE", so the lettering will be pulled out and re-hooked using wools dyed for those words.
It took me forever to decide what to hook for the 'balanced' part of the rug. It is so darn narrow nothing seemed to work. My husband suggested hooking a neck tie . . . it is long, I could make it colorful . . . but it didn't go with the rest of the rug. I'm going with a kind of patch work quilt thing and have a "Georgia Peach' in the center squares.
I'm sure hoping to have this thing completed in the next few weeks!